
Step-by-step Validation Rules in Salesforce

Table of Contents
- Validation Rules
- How to Create a Validation Rule?
- Profiles
- Creating a Validation Rule in Salesforce
- Frequently Asked Questions
- What is the purpose of validation rules?
- Explain how to create a validation rule?
- How can you use formula expressions?
- where you would use a validation rule?
- How can you ensure that your validation rules?
Validation Rules:
Validation rules are used in Salesforce to enforce users to enter correct information when creating and modifying records. It helps us to maintain the accuracy and the quality of the data stored.
Salesforce triggers validation rules before saving the data, allowing us to guarantee that no incorrect information exists in the database at any time.
Previous article, Record types in Salesforce, explains about Record Types.
How to Create a Validation Rule in Salesforce?
Name and Description: serve as the foundational elements of a validation rule. The name should be descriptive and concise, giving a clear indication of the rule’s purpose. For example, if the rule is designed to ensure that a phone number field is formatted correctly, a suitable name might be “Phone_Number_Format_Validation.” Alongside the name, the description provides additional details, explaining the rule’s intent and its application within the Salesforce org. This helps in maintaining clarity and ensuring that other users or administrators understand the rule’s purpose.
Read more: String methods in Salesforce apex
The Rule (the Error Condition Formula): is where the actual logic of the validation rule is defined. This is a formula expression that evaluates to true or false. If the expression evaluates to true, it means that the data entered does not meet the specified criteria, and the validation rule will trigger an error. For instance, using our phone number example, the formula might check that the phone number field contains exactly ten digits, and if not, the rule is violated.
The Error Message: is a critical component that communicates directly with the end-user. When the validation rule is triggered, this message is displayed on the screen, informing the user of the specific issue that needs to be addressed. It should be clear, instructive, and direct the user on how to correct the error. Continuing with our example, the error message could be, “The phone number must be in the format of 10 digits without any special characters or spaces.
Read more: SOQL Query in Salesforce
In the free Developer edition, we can use up to 100 active validation rules per object. In the Unlimited edition, the limit increases to 500.
Read our Free tutorials on Salesforce Admin, Developer(Apex) and LWC.
Let’s see an example of how validation rules are created using the standard Account object in our application.
Currently, the Account object doesn’t enforce any rules and allows users to save records with only the account name while all the other fields are left blank.
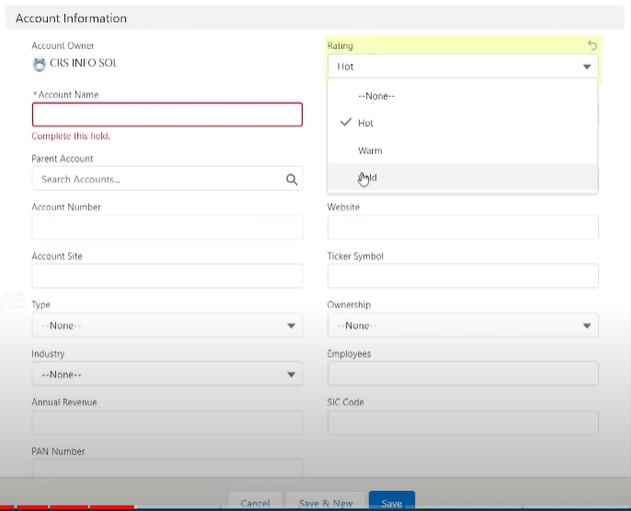
We need to change this behavior to ensure the fields Rating, Phone, and Annual Revenue are never left blank in a record. We also need to make sure the format of the PAN Number adheres to a certain pattern. To achieve this, we can create a validation rule to check and validate these field states when creating records.
Read more: Workflow rules in Salesforce.
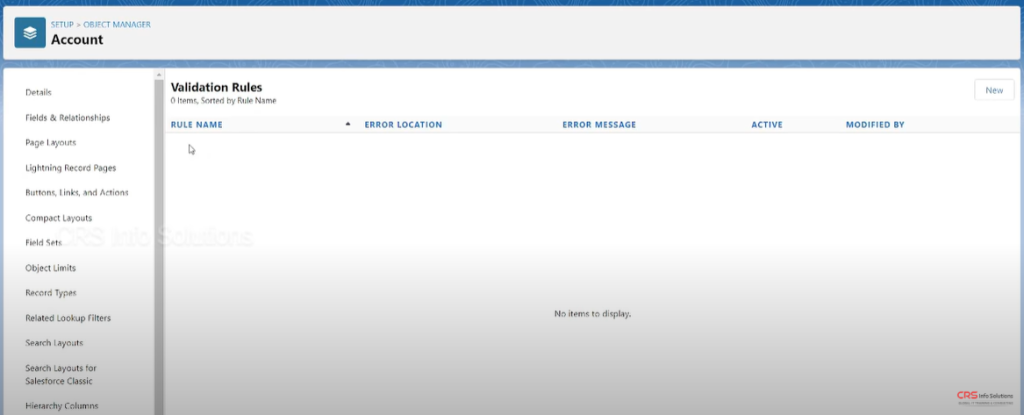
For this, first, go to the Account object on the Object Manager and open the Validation Rules pane. Choose the New option to start creating a new rule.
You can give the rule a relevant name and set it to Active.
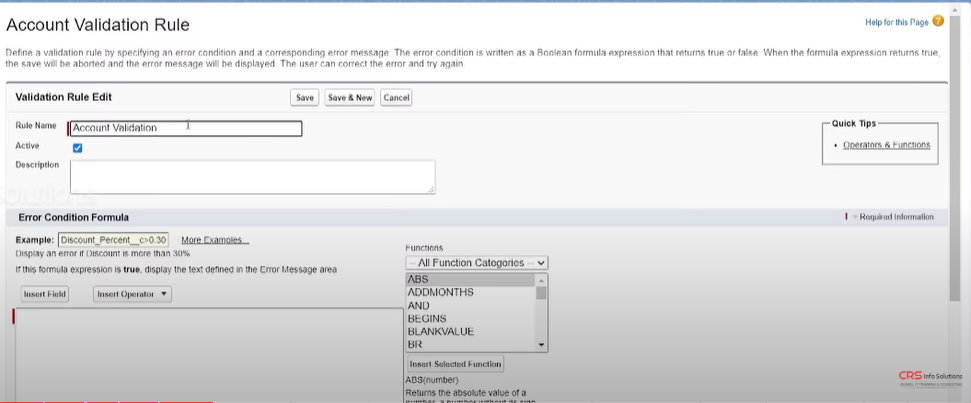
Then, you have to enter the Error Condition Formula. We can use several built-in functions Salesforce provides to simplify this process. This includes functions like ISNULL, ISBLANK, and OR.
Read more about custom page layouts in Salesforce.
The formula that ensures the Phone field never stays blank is:
ISBLANK(Phone)
You can insert fields to the formula using the “Insert Field” button at the top.
To ensure the Annual Revenue is not null, use:
ISNULL(AnnualRevenue)
To ensure the Rating field is not blank:
ISBLANK(TEXT(Rating))
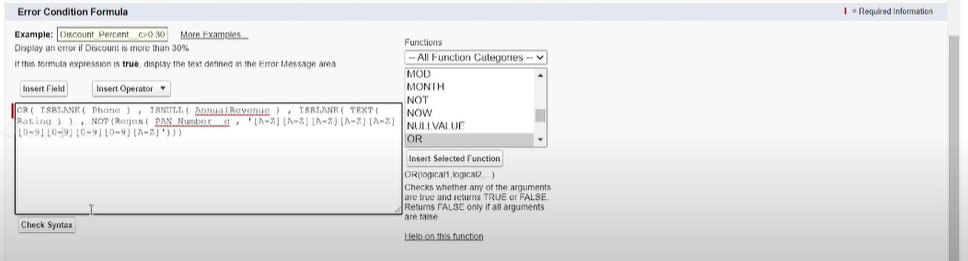
To ensure the PAN Number adheres to a specific format, use regex to create the rule like this:
NOT( Regex(PAN_Number__c, ‘[A-Z][A-Z][A-Z][A-Z]{0-9}{0-9}{0-9}{0-9}{0-9}[A-Z]’) )
Finally, you can combine all these rules with an OR function to ensure that Salesforce triggers an error whenever any of the above rules are violated by a record.
OR(ISBLANK(Phone), ISNULL(AnnualRevenue, ISBLANK(TEXT(Rating)), NOT( Regex(PAN_Number__c, ‘[A-Z][A-Z][A-Z][A-Z]{0-9}{0-9}{0-9}{0-9}{0-9}[A-Z]’) ))
Read more: record types in Salesforce.
You can check the syntax of the entered formula using the Check Syntax option.
Then, add an appropriate error message to display and choose the location it should be displayed in. After completing all that, you can save this new validation rule.

You can check how the rule works in action by creating or modifying records with the wrong formats.
Read more: Approval Process in Salesforce.
Profiles:
Profiles are used in Salesforce to define different sets of permissions granted to different users based on their responsibilities. It acts as an interface between the user and the org when accessing Salesforce features. The profile assigned to a user determines which objects and fields they are allowed to access and modify under different circumstances.
While Salesforce comes with numerous standard built-in profiles, you also have the ability to create custom ones according to your needs. Whether they are standard or custom profiles, each of them should be associated with a respective user license to be accessible.
Read more: Understanding roles and profiles in salesforce.
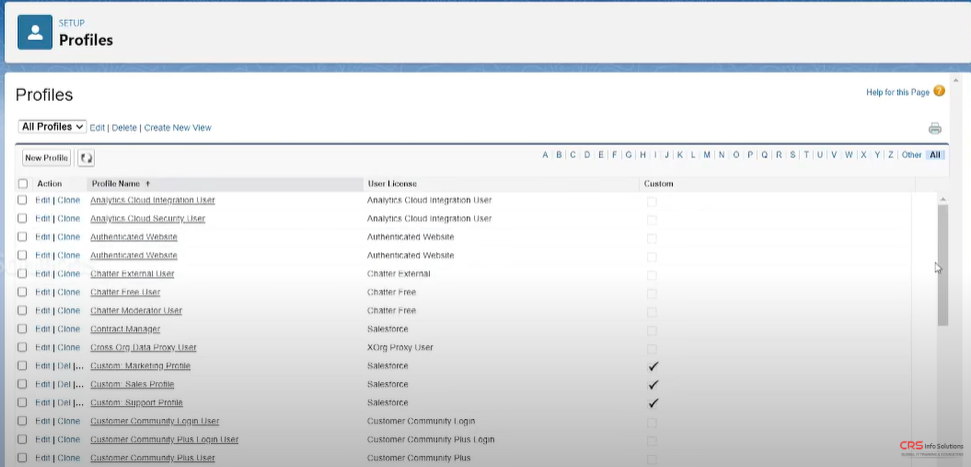
To view a list of profiles available in your org, you can simply search for “profiles” and go to the Profiles pane listed under Users. You’ll be able to see the profile you’re currently assigned, System Administrator, with this view.
Read more: Roles in Salesforce
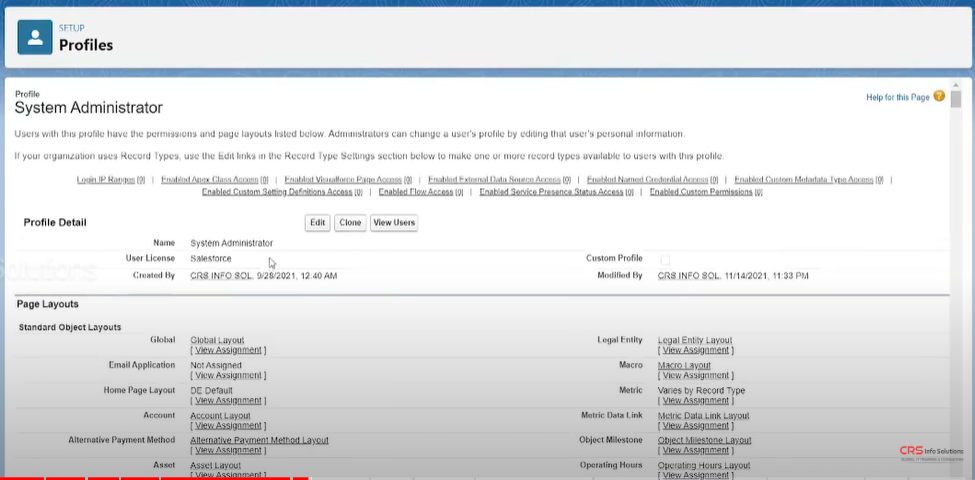
If you open this profile, you’ll see how it lists the different access permissions and page layouts associated with it by default. It’ll also give you different options to change these existing settings to create something more tailored to your needs.
Now, let’s see how you can create a custom profile on Salesforce.
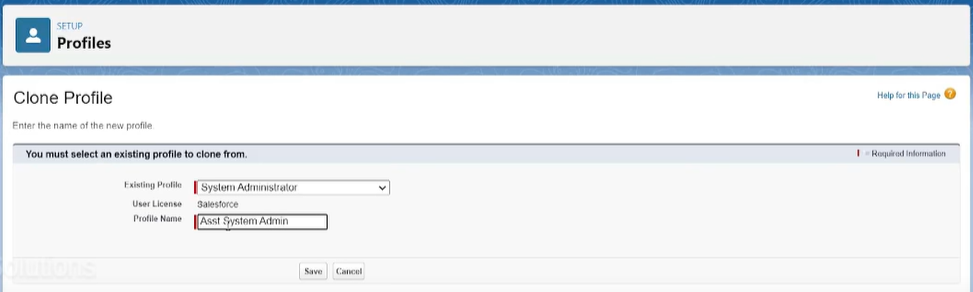
The previous Profiles page gives you the option to create a new profile at the top of the page. It takes you to a page where you can pick an existing profile to clone as a way to get started quickly. Give the new profile a name and save it.
It takes you to the Profile details page where you can edit its permissions and page layouts to fit the requirements.
The top of the page also gives you a “View Users” button which takes you to a list of users currently assigned to this profile. Right now, our new custom profile’s user count is zero.
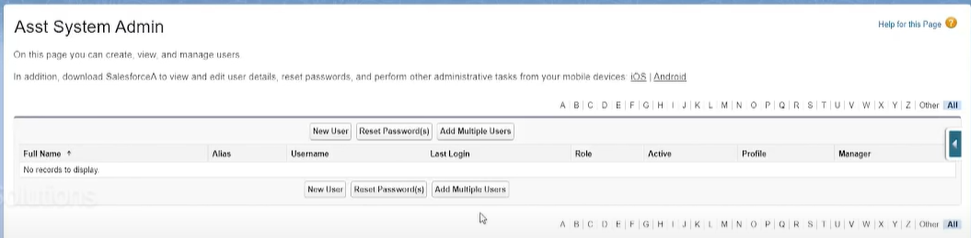
You can add new users to it one or multiple at a time. Let’s try the New User option which adds a single user to the profile.
I am sure you’ll crack any job interview if you can practice these Salesforce interview questions. Don’t forget to make small progress everyday.
Fill in the details of the user as appropriate. Select their proper user license and profile and set them to “Active.”
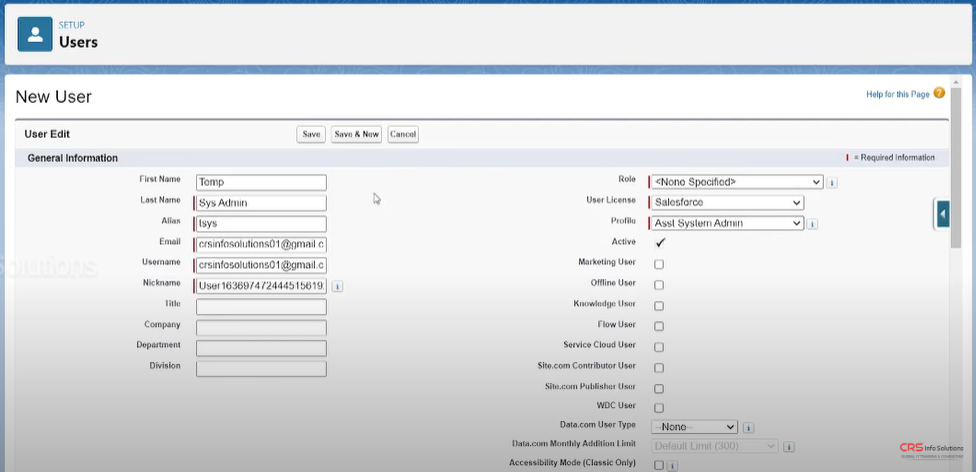
Finally, save the new user.
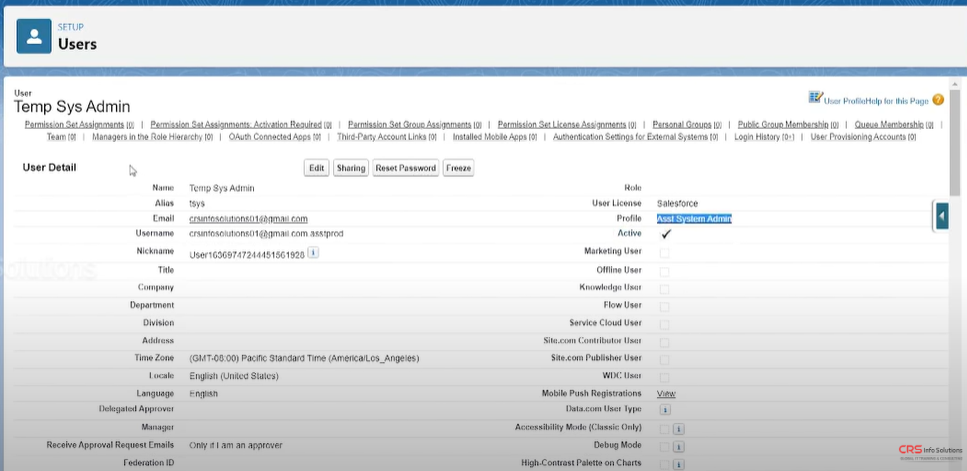
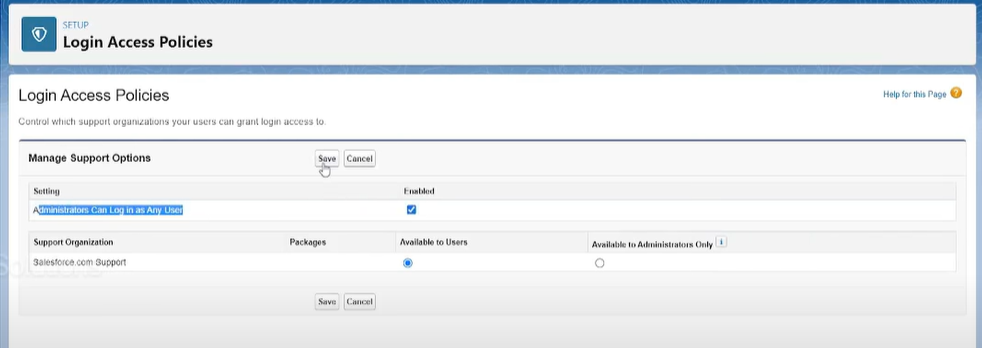
You can log in as this new user to Salesforce to test out if the permissions work as you assigned them during creation. To make things easy and test the profile while in your current System Administrator profile, enable “Administrators can log in as any user” in Login Access Policies and log in to the new custom profile from the Users pane.
Read more: Types of relationships in Salesforce
Next article, Permission Sets in Salesforce explains about Permission Sets.
Creating a Validation Rule in Salesforce:
Constructing a validation rule in Salesforce involves three primary components:
- Name and Description
- The Rule (Error Condition Formula)
- The Error Message
Let’s examine an example of a ‘Closed Lost Reason’ validation rule from the perspective of an administrator.
Read more: What are Page layouts in Salesforce and how to create Page layouts?
Name and Description
A concise and clear name and description are crucial. They serve as a part of your organization’s documentation, aiding others in understanding the rule’s purpose and facilitating future modifications.
Aim for simplicity in your description. It might be similar to the error message (step #3), but also include details such as who requested the rule or what data issues it aims to prevent.
The Rule (Error Condition Formula)
Crafting the validation rule is the most challenging aspect of this process. Even as an experienced Salesforce user, I often refer to validation rule guides for assistance (and you might find it helpful to bookmark this page as well).
The “Error Condition Formula” is the technical term for the rule. This is where you instruct Salesforce with conditions like:
“If the Opportunity ‘Stage’ is ‘Closed Lost’ | then the ‘Closed Lost Reason’ field must not be empty”
Below are explanations for each button above the formula box, allowing you to experiment with Validation Rules using the 14+ examples provided:
- Insert Field: Opens a window listing fields in the object for which you’re writing the validation rule. Using this button not only saves time but also reduces errors caused by slight discrepancies in field names. For instance, the API Name for Opportunity Stage is “StageName,” not “Stage.” After locating your field, click the “Insert” button to add it to the formula.
- Insert Operator: Displays a dropdown menu with operators like + (add), <> (not equal), etc., using standard mathematical syntax. Essential operators for connecting your formula statements are && (and) and || (or).
- Insert Selected Function: Lists functions that might be unfamiliar. There are various types of functions (see the full glossary here). By selecting one, a description appears below the list. Commonly used functions include ISBLANK(field), ISPICKVAL(field, specific picklist value), TEXT(), AND(), and OR().
- Check Syntax: Verifies if the rule is correctly written, with Salesforce indicating any issues. Common problems include missing parentheses, misspelled field names, or incorrect function usage.
The Error Message
This message appears when a user fails to meet the validation rule’s requirements. It guides the user on how to correct the record before attempting to save again.
You can choose to display the error message at the top of the page or above the specific field causing the error. If the rule references only one field, it’s advisable to position the error message on that field; otherwise, place it at the top of the page.
To activate your rule, ensure that the “Active” checkbox is checked.
CRS Info Solutions offers real-time Salesforce course for beginners designed to equip learners with practical knowledge and industry skills in Salesforce. Enroll for demo today.
When gearing up for a Salesforce position, it’s crucial to be well-prepared for the interview process. To assist you in this endeavor, we have put together an extensive collection of Salesforce interview questions and answers, which encompass a wide range of topics from basic concepts to advanced features, ensuring you have a solid understanding before your interview.
Frequently Asked Questions:
What is the purpose of validation rules in Salesforce, and how do they improve data quality?
The purpose of validation rules in Salesforce is to ensure the accuracy and integrity of the data entered into the system. These rules are crucial for maintaining high data quality, as they enforce specific criteria that records must meet before they can be saved. By setting up validation rules, administrators can prevent users from entering incorrect or incomplete data, which could lead to inconsistencies and errors in reporting, analysis, and business processes.
Read more: Validation rules in salesforce.
For example, imagine a scenario where a company requires all opportunity records to have a closing date within the current fiscal year. A validation rule can be created to enforce this requirement, ensuring that users cannot save an opportunity record with a closing date outside the specified range. This helps in maintaining accurate forecasting and aligning opportunities with the company’s fiscal planning.
Validation rules are defined using a formula expression that evaluates to true or false. If the expression evaluates to true, it means the data entered does not meet the specified criteria, and an error message is displayed to the user, preventing the record from being saved. For instance, a validation rule to enforce the closing date requirement mentioned earlier could be:
AND(
   NOT(ISBLANK(CloseDate)),
   OR(
      CloseDate < DATE(YEAR(TODAY()), 1, 1),
      CloseDate > DATE(YEAR(TODAY()), 12, 31)
   )
)
This rule checks if the CloseDate field is not blank and if it falls outside the range of the current calendar year. If both conditions are met, the rule evaluates to true, and the user is prompted to enter a valid closing date.
Overall, validation rules in Salesforce are a powerful tool for maintaining data integrity and ensuring that the data aligns with the organization’s business rules and requirements. By carefully crafting these rules, administrators can prevent common data entry errors and uphold the quality of the data in the system.
Can you explain how to create a validation rule in Salesforce and provide an example of a common use case?
Creating a validation rule in Salesforce involves defining the criteria that records must meet and specifying an error message to display when those criteria are not met. Validation rules help ensure that the data entered into Salesforce meets the business requirements and maintains data integrity.
To create a validation rule, navigate to the Object Manager in Salesforce Setup, select the object you want to apply the rule to, and then click on “Validation Rules.” Click “New” to create a new rule. In the rule definition, you will use a formula expression to specify the criteria. This formula should evaluate to true when the data does not meet the desired criteria.
Read more: SOSL in Salesforce
For example, let’s say we want to create a validation rule on the Account object that ensures the Annual Revenue field is not left blank for any account with the Type set to “Customer.” The formula for this validation rule would be:
AND(
   ISPICKVAL(Type, "Customer"),
   ISBLANK(AnnualRevenue)
)
This formula checks if the Type is “Customer” and if the Annual Revenue field is blank. If both conditions are true, the rule evaluates to true, and the error message is displayed, preventing the record from being saved.
Finally, you need to provide an error message that will be displayed to the user when the validation rule is triggered. This message should clearly explain what needs to be corrected. For our example, the error message could be: “Customer accounts must have an Annual Revenue value.”
By following these steps, you can create validation rules in Salesforce to enforce data quality and ensure that records meet your business requirements.
How can you use formula expressions in validation rules to enforce complex business logic?
In Salesforce, formula expressions in validation rules are used to enforce complex business logic by defining conditions that records must meet. These expressions can include various functions, operators, and references to fields on the record.
Checkout: DML statements in Salesforce
For example, consider a scenario where a business rule requires that if an Opportunity is marked as ‘Closed Won’, the ‘Amount’ field must be greater than zero. A formula expression for this validation rule could be:
AND(
   ISPICKVAL(StageName, "Closed Won"),
   Amount <= 0
)
This expression checks if the StageName field is set to ‘Closed Won’ and if the Amount is less than or equal to zero. If both conditions are true, the rule evaluates to true, and an error message is displayed, preventing the record from being saved.
Read more: Loops in Salesforce Apex
Formula expressions can also use logical operators like AND, OR, and NOT to combine multiple conditions. For instance, if a business rule requires that a ‘Project Start Date’ must be before the ‘Project End Date’ and both dates must be in the future, the formula could be:
OR(
   Project_Start_Date__c >= Project_End_Date__c,
   Project_Start_Date__c < TODAY(),
   Project_End_Date__c < TODAY()
)
This expression checks if the start date is on or after the end date, or if either date is in the past. If any of these conditions are true, the rule evaluates to true, and the record cannot be saved.
By using formula expressions, validation rules in Salesforce can implement complex business logic to ensure data integrity and adherence to business requirements.
Describe a scenario where you would use a validation rule instead of a workflow rule or a trigger in Salesforce.
In Salesforce, validation rules are used to enforce data integrity by setting conditions that records must meet before they can be saved. While workflow rules and triggers can also enforce business logic, there are specific scenarios where validation rules are more appropriate.
For example, consider a scenario where a company has a policy that the discount on an Opportunity should not exceed 30% of the total amount.
A validation rule can be created to enforce this policy:
Discount__c > 0.3 * Amount
This validation rule checks if the discount exceeds 30% of the amount and prevents the record from being saved if the condition is met.
Read more: Methods – Salesforce Apex
In contrast, workflow rules are better suited for scenarios where an action needs to be taken automatically when certain criteria are met, such as updating a field or sending an email alert. Triggers, on the other hand, are used for more complex logic that cannot be achieved with workflow rules or validation rules, such as updating related records or performing calculations involving multiple objects.
Validation rules are preferred when the primary goal is to prevent invalid data from being saved, and the logic can be expressed as a simple condition. They are easy to set up and do not require coding, making them a quick and effective way to enforce data quality.
How can you ensure that your validation rules do not negatively impact the user experience or data entry process in Salesforce?
To ensure that validation rules do not negatively impact the user experience or data entry process in Salesforce, it’s important to follow best practices when creating and implementing them.
Firstly, make sure the validation rule is necessary and aligns with the business requirements. Overusing validation rules can lead to a frustrating user experience, as users may find themselves repeatedly blocked from saving records. For example, a validation rule that requires a phone number to be in a specific format is useful, but adding too many formatting rules for different fields can be cumbersome.
Read more: Objects – Salesforce Apex
Secondly, provide clear and concise error messages that guide the user on how to correct the data. Instead of a generic “Error: Invalid data,” a more helpful message would be “Error: Phone number must be in the format (XXX) XXX-XXXX.”
Additionally, consider the timing of when the validation rule should be enforced. For instance, it might be more user-friendly to allow a sales representative to save an Opportunity as a draft with incomplete data and enforce the validation rules only when they try to change the stage to “Closed Won.”
Finally, regularly review and update validation rules as business processes evolve. What was once a critical validation may become obsolete, and keeping outdated rules can hinder the data entry process.
By following these guidelines, you can ensure that validation rules enhance data quality without compromising the user experience.
Readmore: Database methods in Salesforce Apex

